
Showing posts with label Tasty Tuesday. Show all posts

Tuesday, August 07, 2012

Tasty Tuesday {Microphone Cupcakes}

Back in March I made these cute cupcakes for Abby's Pop Star Birthday Party. They were a huge hit and oh, so fun to make.
Can you tell what they are?  Yes, they are mini microphones.  They are really very simple.  Take a cupcake and ice it whatever color you want {in this case Abby chose pink}.  For the microphones you will need...mini ice cream cones, silver sprinkles, white candy melts and cake balls.  Make your cake balls and freeze them for about 15- 20 minutes.  Pull them out of the freezer and working quickly and using a sqeewer dip them into the melted candy melts and roll in the sprinkles and allow to dry.  Once dry, dip the top of the cone into the candy melts, just enough to use as a glue, and place the cake ball on top.  With the microphones standing allow to dry.  Ice your cupcakes and place your microphones on top of the cupcake.  These can be a little top heavy so if you don't have many party goers you could make Jumbo cupcakes to be a little more stable, but they worked fine just the way they were.

Enjoy!
 

Tuesday, October 25, 2011

Tasty Tuesday-Melted Witch

For the kids class treats this year the kids and I made melted witches. These were so much fun and easy to make that I just had to share it. Here's how to make them...

Oh, and Please Don't let the steps fool you. I promise these are super easy!!


Things you need:
Yellow Laffy Taffy
Pretzel sticks
Green and chocolate candy melts
Oreos
Hershey's Kisses

Roll Laffy Taffy flat with a rolling pin. I found that it was easiest to put parchment paper down on the cutting board so that it doesn't stick.
I used this cute little tool to cut out rectangles and then used it to cut the tines for the broom.

Roll the tines onto the pretzel stick and you have a broom.


You will then need to pull apart the Oreos and discard the centers. Unwrap the Hershey kisses. And melt the green and chocolate candy melts in separate bowls. Spoon green melts onto cookie sheet covered with parchment paper. Next spoon a small amount of chocolate onto center of green melts and gently swirl with a knife. Add your broomstick. Lay an Oreo cookie onto the candy melts and with a small amount of chocolate apply the Hershey kiss to the Oreo.
Move your cookie sheet to the refridgerator until hardened.
And then package them up. The kids loved these and kept quoting the Wizard of Oz. "I'm melting. I'm melting."

Happy Halloween!!!

Tuesday, July 05, 2011

Tasty Tuesday- Red, White and Blue Covered Strawberries

My contribution to our Independence Day Celebration was to make some really cool and tasty chocolate strawberries with a twist. These little beauties had an added element of blue colored sugar on the ends to make it perfect for the 4th of July. And these little beauties also don't take any time at all to make. Here is what you will need...

Strawberries
Almond Bark or White Chocolate
Blue Colored Sugar, if you can't find blue colored sugar just add some blue food coloring to white sugar in a ziploc bag and shake until mixed.

Melt the sugar in a microwave safe bowl, stirring well.

Dip your strawberry into the your melted Almond Bark, being sure to leave some red showing at the top.

And then you will dip the tips into the blue sugar.

And then you have some delicious and festive treats to share with your family and friends. And they also tend to WOW everyone too!!

Happy Baking!!


Tuesday, April 19, 2011

Chocolate Covered Strawberries

Back in February when I posted about our Valentine's Day fun I had some delicious Chocolate Covered Strawberries. Jane Anne over at Gravity of Motion and Owen Home asked me how to make them. Sorry it's taken me so long to post the directions but here they are...
You will need Strawberries, of course, wax paper, and chocolate. I like real CHOCOLATE so I use Baker's. You can also use chocolate chips, Almond Bark or Wilton's Candy Melts. Read the back of the package for melting directions. You can also melt some white chocolate in a ziploc bag and cut a small section of the corner off to add some white lines and to add some interest.

Once all your chocolate is melted you just start dipping. Be sure to leave a little of the red showing, this makes it prettier. Once dipped you put the strawberries onto a cookie sheet lined with wax paper. Once all your strawberries are dipped you slide the pan into the refrigerator until the chocolate is set. Once that happens they are ready to eat.

These are so simple to make but look like you spent hours making them. And displayed like this they are so pretty!

Happy Cooking!

Tuesday, March 08, 2011

Tasty Tuesday- Butterfly Cupcakes

I had such fun last week making cupcakes for Abby's birthday. I ended up making two different batches of cupcakes for her, one for her class to enjoy on Friday and one batch for her tea party on Saturday. I will post the ones from Friday later but here are the instructions for the butterfly cupcakes from Abby's party.

I got the idea for these cute cupcakes from the book Hello, Cupcake! by Karen Tack and Alan Richardson. If you haven't looked at this book you need to. And don't be intimidated by these cupcakes. They are actually really easy to make. I have never taken any cake decorating classes so this is all fairly new to me. Anywhoo, here is what you will need.

Cupcakes
2 colors of candy melts of your choosing (I used pink and dark chocolate)
dark chocolate frosting
1 can of icing (color of your choice, this will be your background)
brown M&M's
sprinkles (I used clear glitter sprinkles)
Ziploc bags
Wax paper
round toothpicks or skewers

1. You will need an outline of your butterfly. I traced the one in the book using tracing paper. I then melted the candy melts according to the directions on the back of the package. I bought Wilton's candy bottles and used these. Though I would not do this again. The bottles both got cracks in them making them very hard to use. Instead you can use ziploc bags. You can melt the candy right inside the bags. You will need to leave the top open and microwave for 10 seconds, massage and repeat until all the candy has melted. You will then press out any excess air and seal the bag.

2. Snip a very small amount from the corner of the bag. You will then need to outline one wing onto wax paper. Go over the outline once or twice more to thicken the wing.

Once you are finished with the outline you will fill in the wing with your second color. You can fill in any holes by using a toothpick or skewer. You can also try tapping the pan slightly but this almost never worked for me. You will also need to make antennas for each of your butterflies. To do this you will make a bunch of curvy capital y's.
Next you will need to start pulling the dark chocolate into the other color. Have fun with this part. Pretty much anything goes. It is very important to only do on wing at a time because the chocolate starts to set up pretty quickly and then this part is almost impossible to get right. You will then sprinkle with nonpareils or sugar glitter and put into the fridge.
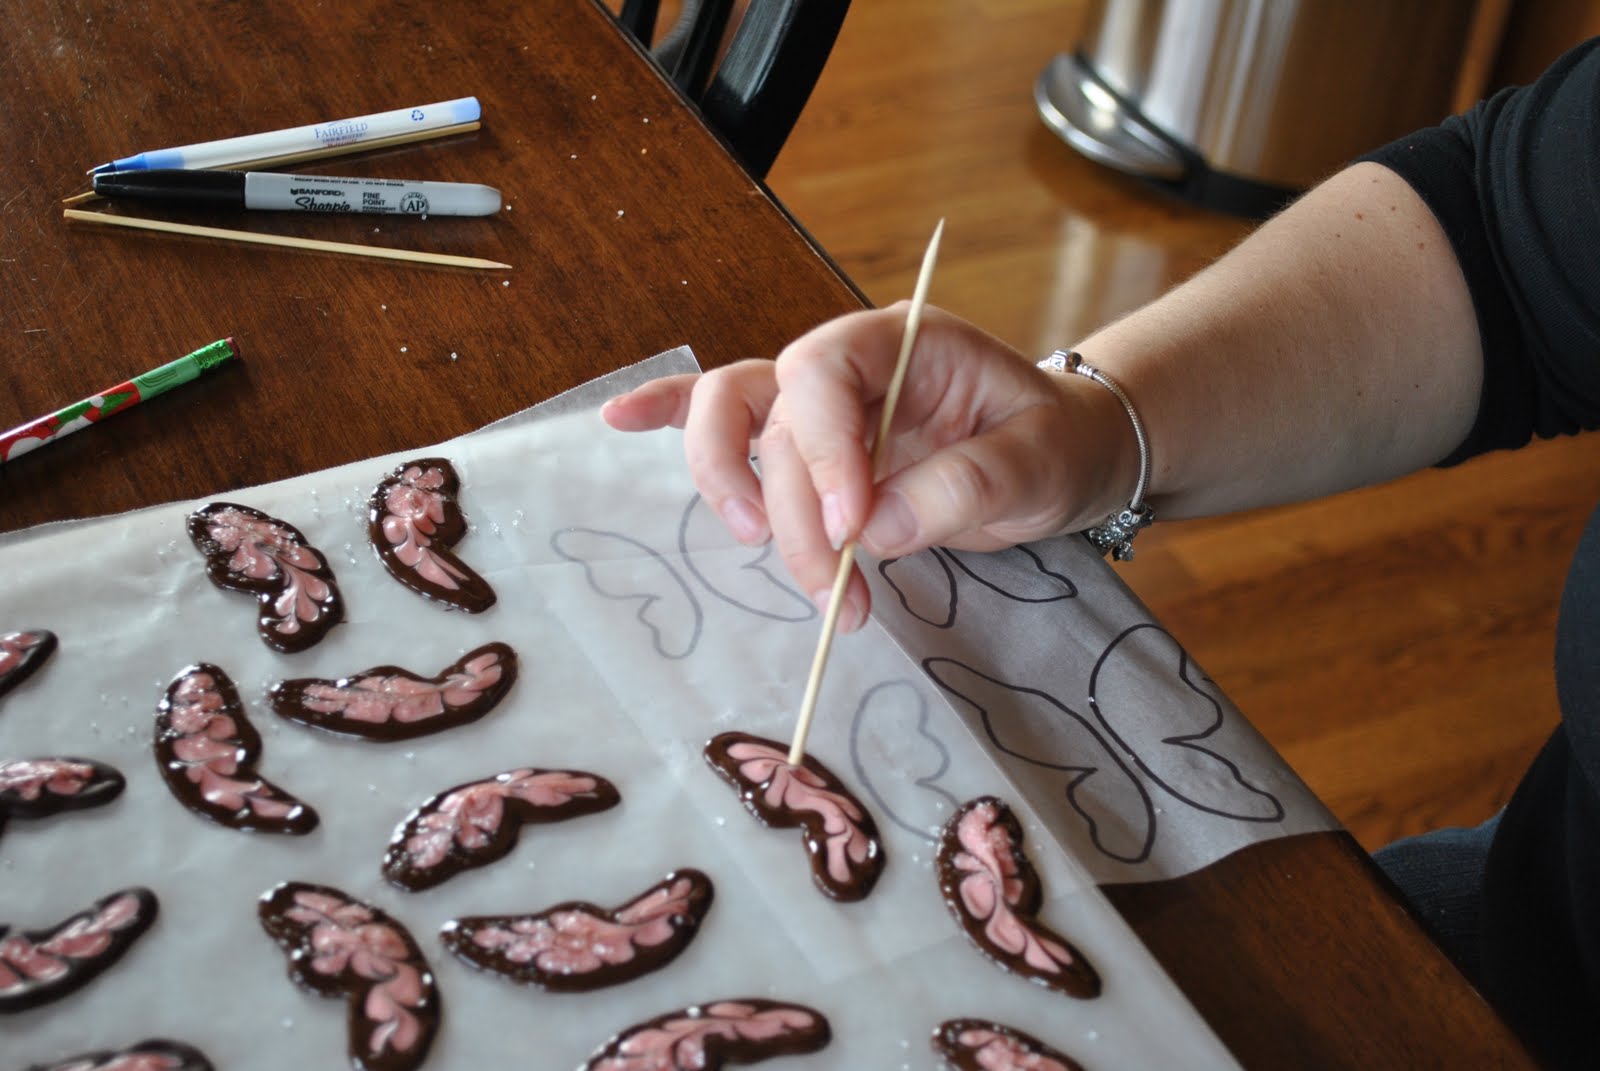
3. Once your butterflies are fully set up you can start putting them together. Ice your cupcakes in the color of your choice. Put two M&M's side by side with a small space between...your wings will be sitting on the M&M's.
Carefully remove your wings from the wax paper and place them resting on the M&M's side by side. Next you will stick the antenna into the top of the cupcakes.
4. Fill a ziploc bag with the chocolate frosting. Cut a small corner and pipe the frosting to form the body of the butterfly.
And there you have a beautiful butterfly cupcake that you made all by yourself. Now wasn't that easy!?!
Happy Baking!!!

Tuesday, March 01, 2011

Tasty Tuesday- The Cat In The Hat

Dr. Seuss' birthday is tomorrow. And with that in mind I thought it would be fun to make some Dr. Seuss themed treats. Green Eggs and Ham is old school everyone does that so instead we are having Cat in the Hat themed treats. Oh, and by the way these are so easy to make too! I got a little carried away making them, so had enough extras to send to all the kids classrooms and some to Matt's work. Here's a picture of what we will be making.
Aren't they just so cute!?!

Here's a quick run down of everything you will need. Either parchment paper or wax paper, red candy melts (I used Wilton), regular marshmallows, skewer, lollipop sticks, bags and twist ties.

Start by melting the melt per instructions. Then dip one third of the marshmallow into the melted candy and place onto wax paper. Let harden.

This is what they will look like when you have finish dipping the first third.

Once dry you will turn them over and dip the other side into the candy melts, leaving a center white portion. Let these dry.


While these are drying you will need to roll out a brim for your hat. To do this cut a marshmallow in half. I found it was easier to use scissors to do this. Then you will use a rolling pin to flatten the marshmallow. Be sure to place the cut side down onto the parchment paper or your rolling pin will become messy very quickly.

After everything has dried and your brims are rolled out you are ready to assemble your hats. place the sticky side of the rolled marshmallow against the hat. Using a skewer poke a hole through the brim and into the hat. Pull skewer out and replace with lollipop stick. Then wrap in candy bag and close with a twist tie. Then you have your Cat In The Hat hat.


Enjoy your treats and remember....

"You're never too old, too wacky, too wild, to pick up a book and read to a child."
So sit back, enjoy your treats and a little of Dr. Seuss reading. I don't know about you but I still love reading his books and my kids do too.

Happy Cooking and Reading!!!

Tuesday, February 15, 2011

Tasty Tuesday- Sausage -Stuffed French Loaf

This is another recipe from one of my favorite cookbooks, Easy Weeknight Favorites. It's a hardy meal and every single person at the table ate it and said how good it was. Which surprised me with the kids. I wasn't sure how well it would go over with them. The recipe was much easier than I thought it would be. And surprisingly enough it was good as leftovers too. I just popped it in the oven to heat it up. Oh, and I ended up doubling the recipe. Anyway, here's the recipe.
Stuffed French Loaf

1 (16 ounce) loaf unsliced French bread
1/2 pound pork sausage
1/2 pound ground chuck
1 medium onion, chopped
1 cup (4 ounces) shredded mozzarella cheese
1 large egg, lightly beaten
1/4 cup chopped fresh parsley
1 teaspoon Dijon mustard
1/4 teaspoon fennel seeds
1/4 teaspoon salt
1/4 teaspoon pepper
2 tablespoon butter or margarine
1 large clove garlic, crushed

Cut off ends of loaf; set ends aside. Hollow out center of loaf with a long serrated bread knife, leaving a 1/2 inch shell. Position knife blade in food processor bowl; add bread removed from inside loaf. Process to make coarse crumbs. Set bread shell and crumbs aside.

Cook sausage, beef, and onion in a large skillet over medium-high heat until meat is browned, stirring until it crumbles; drain. Add 1 cup of reserved breadcrumbs, cheese, and next 6 ingredients; stir well. Spoon meat mixture into shell; replace loaf ends, securing with wooden picks.

Melt butter in a saucepan. Add garlic; cook about 1 minute. Brush butter mixture over loaf. Wrap loaf in aluminum foil, leaving open slightly on top; place loaf on a baking sheet. Bake at 400 degrees for 25 minutes or until loaf is heated and cheese melts. Cut into 4 pieces. Yield: 4 servings.
Happy Cooking!!!


Tuesday, February 08, 2011

Tasty Tuesday- Baked Potato Soup

This recipe is a Pampered Chef recipe that is oh, so good! It's a wonderful recipe for those cold winter nights. I often make grilled cheese or a salad to go along with this meal. Happy cooking!


4 medium baked potatoes
2 slices bacon
1/2 cup celery, chopped
1/2 cup green onions with tops, thinly sliced
1 can (14.5 ounces) chicken broth
1 1/2 cups milk
1 garlic clove, pressed
1/2 teaspoon salt
1/4 teaspoon ground black pepper
1 cup light sour cream
2 ounces cheddar cheese, shredded (1/2 cup)

1. Remove skins from baked potatoes. Coarsely mash potatoes with potato masher.
2. Cook, bacon over medium heat until crisp. Remove bacon from pan to paper towel, crumble and set aside. Discard all but 1/2 teaspoon drippings in pan.
3. Meanwhile, chop celery. Add chicken broth, milk, mashed potatoes, celery, onions, garlic, salt and pepper to drippings in pan. Bring to boil. Reduce heat; simmer 10 minutes.
4. Stir in sour cream and reserved bacon. Ladle soup into bowls and top with shredded cheese.

Optional toppings: sour cream, green onions and bacon crumbles.

Tuesday, November 02, 2010

Tasty Tuesday- Mr. Bones Jangles

Have you seen those really neat cupcake books yet? You know, the books that tell you that you can make absolutely cute cupcakes that look impossible to make? The books are titled Hello, Cupcake! and What's New, Cupcake? both by Karen Tack and Alan Richardson. Well, I bought both books because I thought the cupcakes were so cute and that I might try my hand at making a couple of them. And so for Halloween I made the Mr. Bones Jangle cupcakes. I decorated my pan a little differently than the authors did, but I think they turn out great! And with no further ado.....

Mr. Bones Jangle

It's not a recipe but it does fit with the "Tasty" part of Tasty Tuesday. I hope you enjoy. I am also planning on making one of the recipes in the cupcake books for Elizabeth's birthday. I just haven't decided which one yet? I don't think that Elizabeth has been able to decide on one either.

Tuesday, October 19, 2010

Tasty Tuesday- Stuffed Acorn Squash

I discovered this recipe in the February issue of Good Housekeeping. I pulled it out of the magazine in July when cleaning out the magazine rack and thought it looked good. On Sunday night I finally made it. The kids looked at it like it was from a foreign planet but once they actually took a bite they cleaned their plates. They didn't clean out the acorn squash like Matt and I did but I was glad they actually ate and liked it. I thought that the acorn squash tasted a lot like a sweet potato, so I can understand why a lot of recipes with acorn squash involve cinnamon. Anywhoo, here's the recipe. I hope you enjoy!

Ingredients

* 2 (1 1/2 pounds each) acorn squash, each cut in half and seeded
* 1 teaspoon(s) olive oil
* 2 ounce(s) pancetta, finely chopped
* 1 small (4 to 6 ounces) onion, finely chopped
* 2 large stalks celery, finely chopped
* 1/8 teaspoon(s) crushed red pepper
* Salt
* Pepper
* 1 1/2 cup(s) cooked white kidney (cannellini) beans, or 1 can (15 ounces) low-sodium white kidney (cannellini) beans
* 1/4 cup(s) water
* 1 package(s) (7.4 ounces) heat-and-serve precooked wild rice, do not heat
* 4 teaspoon(s) (pignoli) pine nuts
* 1/2 cup(s) packed fresh basil leaves, thinly sliced

Directions

1. Preheat oven to 375 degrees F. Line 15 1/2-inch by 10 1/2-inch jelly-roll pan with foil. On large microwave-safe plate, arrange squash halves in single layer, cut sides down. Microwave on High 9 to 11 minutes or until knife pierces flesh easily.
2. Meanwhile, in 12-inch skillet, heat oil on medium-high until hot. Add pancetta and cook 3 to 4 minutes or until browned and crisp, stirring frequently. With slotted spoon, transfer to paper towels to drain; do not remove skillet from heat. To drippings in skillet, add onion, celery, crushed red pepper, 1/4 teaspoon salt, and 1/4 teaspoon freshly ground black pepper. Cook 4 to 5 minutes or until vegetables are tender and golden brown, stirring frequently. Remove from heat. In small bowl, mash 1/4 cup beans with water. Into vegetables in skillet, stir rice, mashed beans, whole beans, pancetta, 2 teaspoons pine nuts, and half of basil.
3. On prepared jelly-roll pan, arrange squash halves in single layer, cut side up. Divide bean mixture among squash cavities, pressing firmly into cavities and mounding on top. Cover pan with foil. Bake 15 minutes. Uncover and bake 5 to 7 minutes longer or until squash and vegetables are golden on top. Garnish with remaining pine nuts and basil.

Tips: When picking out an acorn squash you want one that seems heavy for it's size, it should be dark green in color with orange not yellow, this is the part that touched the ground, the skin will also be hard. You do not want one that is soft!

Also in order to get a clean cut for this recipe...pierce the skin with a fork and microwave a few minutes before attempting to cut. Matt and I made a huge mess trying to get the suckers cut in half without that little tip! Wish I had thought to take a picture!

Monday, September 13, 2010

Tasty Tuesday- Ham and Potato Casserole

This is a recipe that Matt requests for me to make often. The kids usually get excited about this meal as well. In fact when the girls came down to help empty the dishwasher and saw this sitting in the casserole dish waiting to go into the oven they both said, "Yummy! My favorite!" And any recipe I can get that reaction from is a winner in my book. We generally have leftovers so we can eat it two nights which makes things easier on me. And the leftovers are pretty good too. I almost think with this recipe it's better the second time around. I generally serve this with a salad and some fruit fro dessert. Tonight we are having Cantalope, which is one of Matt's favorite fruits. Though I can't stand the taste or the smell.

Ham and Potato Casserole


Prep: 10 minutes Cook: 30 minutes

1 (26 ounce) package frozen shredded potatoes
1 (1 pound) ham slice, cut into bite-sized pieces (2 1/2 cups)
1 (10 3/4 oz) can cream of potato soup, undiluted
1/2 teaspoon pepper
1/4 cup grated Parmesan cheese
1 cup (4 ounces) shredded sharp Cheddar cheese
Paprika

Combine first 4 ingredients; spoon mixture into a lightly greased 13 X 9 X 2 inch baking dish. Bake, uncovered, at 400 degrees for 25 minutes; sprinkle with cheeses and paprika. Bake 5 more minutes or until thoroughly heated. Yield: 4 to 6 servings.

* You can use just about and canned "cream of" soup in this versatile casserole.

* I usually buy the cubed ham in the deli section at the grocery store. This saves me a little time in making this meal. I also usually use all 30 ounces of potatoes in the bag. I haven't been able to find a 26 ounces bag of potatoes.